First up, anyone have a kiddo who doesn't fully understand how their turn to be line leader (0r light helper, or door holder, etc) is all of the sudden dramatically over?! Of course you do! It's perfectly natural for a child, especially one with autism, to think that special privilege will never happen again in their lifetime. They are completely distraught about the idea. In addition to writing social stories to address these issues (another post entirely), I have been through a few systems, but I've found the one pictured below to be the most effective. Children can see that when their turn is over, they move to the "bottom of the line", but with this system they begin to learn that the bottom of the line becomes the top again! Voila!

Next up, the subject of classroom rules. This really is a subject you should discuss as a class (I find the How Do Dinosaurs... series is very effective at illustrating the subject of good choices and bad choices), but I wanted to illustrate that any rules your class decides are important are best posted at student eye level and in visual format. I like to use my art cabinets and give each door a rule. When a student has difficulty following a rule, it's easy to take them to that door, discuss the rule, what they did, and how they can better handle it next time. (For reference, our rules for this year were: Wait your Turn, Share with Friends, Hands to Self, Use Nice Words, and Listen to Teachers)

Why not make clean up time easier and help your kiddos be more independent by using shadow labels. Use a visual of any type, digital pictures of the exact object or line drawings, to label a toy bin with the appropriate contents. Then use a matching label on the shelf where the bin should go. I find the picture is more visible when placed in the back, rather than on the shelf itself. When it comes time to clean up, all your students have to do is match the pictures. (It also helps the OCD teacher keep things neat and clean. :) )

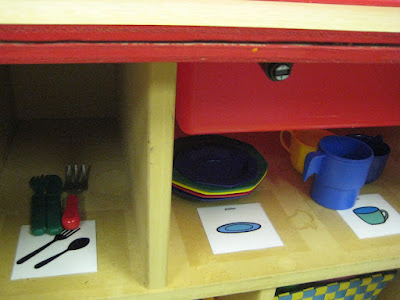
Don't forget, shadow labels are also great for places that are behind closed doors. Here, students sort utensils onto shelves inside the play kitchen...

Finally, I had to throw in the typically class schedule...with a twist. This schedule hangs behind my classroom door. When the door is closed (all day) it is easily visible and I decided it was in the most accessible area of the room. The twist are the small Velcro dots in the middle of each picture. Instead of having a giant finished pocket, my line leader (who is really my all encompassing special helper for the day) can turn over each activity when it is finished. Of course, many of my kiddos have schedules separate from this, consisting of objects, digital pictures, or words...but it is always nice to include my whole class in discussing what is going on in our day and what we have left to do.


No comments:
Post a Comment