May 25, 2010

Visuals...they're not just for schedules!

I think I've mentioned my love for this visual producing software in the past, but let me reiterate...I love Boardmaker. To be honest, I don't really know how any special ed teacher lives without it. I thought I would share some of the less common uses for Boardmaker, and visuals in general, that can help to organize your classroom and keep your kiddos in check. (As a reminder, any visual source (Picture This, clip art, do2learn.com) will be helpful in recreating these materials, get creative!)

First up, anyone have a kiddo who doesn't fully understand how their turn to be line leader (0r light helper, or door holder, etc) is all of the sudden dramatically over?! Of course you do! It's perfectly natural for a child, especially one with autism, to think that special privilege will never happen again in their lifetime. They are completely distraught about the idea. In addition to writing social stories to address these issues (another post entirely), I have been through a few systems, but I've found the one pictured below to be the most effective. Children can see that when their turn is over, they move to the "bottom of the line", but with this system they begin to learn that the bottom of the line becomes the top again! Voila!


Next up, the subject of classroom rules. This really is a subject you should discuss as a class (I find the How Do Dinosaurs... series is very effective at illustrating the subject of good choices and bad choices), but I wanted to illustrate that any rules your class decides are important are best posted at student eye level and in visual format. I like to use my art cabinets and give each door a rule. When a student has difficulty following a rule, it's easy to take them to that door, discuss the rule, what they did, and how they can better handle it next time. (For reference, our rules for this year were: Wait your Turn, Share with Friends, Hands to Self, Use Nice Words, and Listen to Teachers)


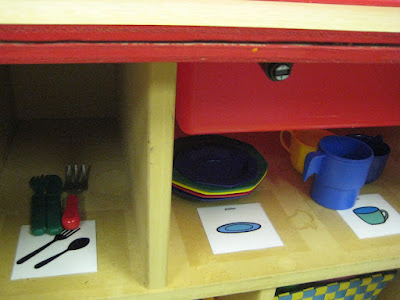
Why not make clean up time easier and help your kiddos be more independent by using shadow labels. Use a visual of any type, digital pictures of the exact object or line drawings, to label a toy bin with the appropriate contents. Then use a matching label on the shelf where the bin should go. I find the picture is more visible when placed in the back, rather than on the shelf itself. When it comes time to clean up, all your students have to do is match the pictures. (It also helps the OCD teacher keep things neat and clean. :) )


Don't forget, shadow labels are also great for places that are behind closed doors. Here, students sort utensils onto shelves inside the play kitchen...


Finally, I had to throw in the typically class schedule...with a twist. This schedule hangs behind my classroom door. When the door is closed (all day) it is easily visible and I decided it was in the most accessible area of the room. The twist are the small Velcro dots in the middle of each picture. Instead of having a giant finished pocket, my line leader (who is really my all encompassing special helper for the day) can turn over each activity when it is finished. Of course, many of my kiddos have schedules separate from this, consisting of objects, digital pictures, or words...but it is always nice to include my whole class in discussing what is going on in our day and what we have left to do.

An oldie, but goodie...

Here's a video clip I made for a T/TAC training last year including some of my Reverse Mainstream kiddos. I would like to think it's a framework for how a SMART Board could be incorporated into circle time. This particular example and the activities included would be perfect for an at-risk preschool program, especially one including children with special needs because the SMART Board makes circle time so interactive. (Also, check out a later (but posted earlier) clip here!)


It really is amazing how one year can change your instructional style, I'll have to upload a current clip soon.

March 16, 2010

Hey there T/TAC!

I'm so glad you stopped by! Don't forget to enter your email address in the left toolbar to receive updates via email. I tried to cover a lot of ground in a short amount of time today, so as you are getting down to business and have questions, leave comments! I'll either answer them by commenting back or I'll create a new post to help solve your problem. My computer and the new version of Notebook are ready and waiting. Hope to hear from you soon!

March 15, 2010

My favorite spot...

My SMARTBoard was installed a week before school started in September. If it looks small, it is, but it's the perfect size for preschoolers. Mine is actually the first one the school ever bought. It was mounted in our computer lab and as they replaced older boards with new ones complete with overhead projectors, the older models found new homes. I was the lucky recipient of Old Faithful, and I'm quite thankful to give him a new home.


They were able to mount it lower than the rest in the school and now my kiddos can reach even the top corners easily with a pointer. I completed my circle time spot with two Walmart rugs ($20 each, yes please) and simple strips of thick masking tape mark where kiddo bottoms go. I had a brainstorm over the summer while imagining the wonder of having my own SMARTBoard and decided to have our school custodian drill a hole in one of my bookcases, and put the projector inside to keep little fingers away from as many cords as possible. For the most part, the rest of my cords run under the rug and I've never had a problem with them.


Above the board, you'll see vinyl letters from Uppercase Living that say "From Small Beginnings Come Great Things" and a canvas that was a permanent fixture in my grandfather's office when he was my principal in primary school (yes, I'm from a small town).

Under the Deep Blue Sea...

Another mural o' art projects...these are from our Ocean Animals unit we just wrapped up complete with a field trip to our local aquarium.